


More on Productivity

Todd Lewandowski
1 year ago
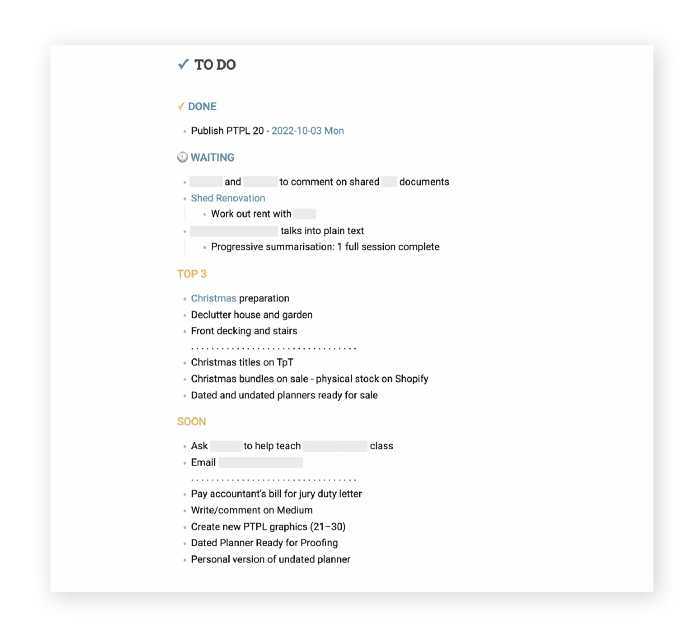
DWTS: How to Organize Your To-Do List Quickly
Don't overcomplicate to-do lists. DWTS (Done, Waiting, Top 3, Soon) organizes your to-dos.

How Are You Going to Manage Everything?
Modern America is busy. Work involves meetings. Anytime, Slack communications arrive. Many software solutions offer a @-mention notification capability. Emails.
Work obligations continue. At home, there are friends, family, bills, chores, and fun things.
How are you going to keep track of it all? Enter the todo list. It’s been around forever. It’s likely to stay forever in some way, shape, or form.
Everybody has their own system. You probably modified something from middle school. Post-its? Maybe it’s an app? Maybe both, another system, or none.
I suggest a format that has worked for me in 15 years of professional and personal life.
Try it out and see if it works for you. If not, no worries. You do you! Hopefully though you can learn a thing or two, and I from you too.
It is merely a Google Doc, yes.
It's a giant list. One task per line. Indent subtasks on a new line. Add or move new tasks as needed.
I recommend using Google Docs. It's easy to use and flexible for structuring.
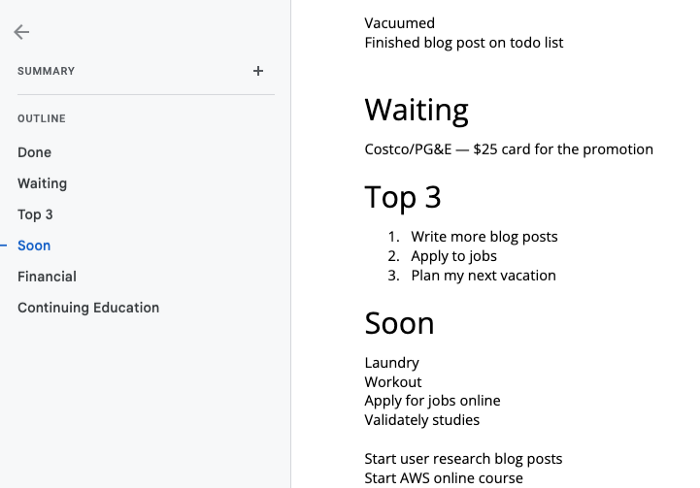
Prioritizing these tasks is key. I organize them using DWTS (Done, Waiting, Top 3, Soon). Chronologically is good because it implicitly provides both a priority (high, medium, low) and an ETA (now, soon, later).
Yes, I recognize the similarities to DWTS (Dancing With The Stars) TV Show. Although I'm not a fan, it's entertaining. The acronym is easy to remember and adds fun to something dull.

What each section contains
Done
All tasks' endpoint. Finish here. Don't worry about it again.
Waiting
You're blocked and can't continue. Blocked tasks usually need someone. Write Person Task so you know who's waiting.
Blocking tasks shouldn't last long. After a while, remind them kindly. If people don't help you out of kindness, they will if you're persistent.
Top 3
Mental focus areas. These can be short- to mid-term goals or recent accomplishments. 2 to 5 is a good number to stay focused.
Top 3 reminds us to prioritize. If they don't fit your Top 3 goals, delay them.
Every 1:1 at work is a project update. Another chance to list your top 3. You should know your Top 3 well and be able to discuss them confidently.
Soon
Here's your short-term to-do list. Rank them from highest to lowest.
I usually subdivide it with empty lines. First is what I have to do today, then week, then month. Subsections can be arranged however you like.
Inventories by Concept
Tasks that aren’t in your short or medium future go into the backlog.
Eventually you’ll complete these tasks, assign them to someone else, or mark them as “wont’ do” (like done but in another sense).
Backlog tasks don't need to be organized chronologically because their timing and priority may change. Theme-organize them. When planning/strategic, you can choose themes to focus on, so future top 3 topics.
More Tips on Todos
Decide Upon a Morning Goal
Morning routines are universal. Coffee and Wordle. My to-do list is next. Two things:
As needed, update the to-do list: based on the events of yesterday and any fresh priorities.
Pick a few jobs to complete today: Pick a few goals that you know you can complete today. Push the remainder below and move them to the top of the Soon section. I typically select a few tasks I am confident I can complete along with one stretch task that might extend into tomorrow.
Finally. By setting and achieving small goals every day, you feel accomplished and make steady progress on medium and long-term goals.
Tech companies call this a daily standup. Everyone shares what they did yesterday, what they're doing today, and any blockers. The name comes from a tradition of holding meetings while standing up to keep them short. Even though it's virtual, everyone still wants a quick meeting.
Your team may or may not need daily standups. Make a daily review a habit with your coffee.
Review Backwards & Forwards on a regular basis
While you're updating your to-do list daily, take time to review it.
Review your Done list. Remember things you're proud of and things that could have gone better. Your Done list can be long. Archive it so your main to-do list isn't overwhelming.
Future-gaze. What you considered important may no longer be. Reorder tasks. Backlog grooming is a workplace term.
Backwards-and-forwards reviews aren't required often. Every 3-6 months is fine. They help you see the forest as often as the trees.
Final Remarks
Keep your list simple. Done, Waiting, Top 3, Soon. These are the necessary sections. If you like, add more subsections; otherwise, keep it simple.
I recommend a morning review. By having clear goals and an action-oriented attitude, you'll be successful.

Simon Egersand
1 year ago
Working from home for more than two years has taught me a lot.
Since the pandemic, I've worked from home. It’s been +2 years (wow, time flies!) now, and during this time I’ve learned a lot. My 4 remote work lessons.
I work in a remote distributed team. This team setting shaped my experience and teachings.
Isolation ("I miss my coworkers")
The most obvious point. I miss going out with my coworkers for coffee, weekend chats, or just company while I work. I miss being able to go to someone's desk and ask for help. On a remote world, I must organize a meeting, share my screen, and avoid talking over each other in Zoom - sigh!
Social interaction is more vital for my health than I believed.
Online socializing stinks
My company used to come together every Friday to play Exploding Kittens, have food and beer, and bond over non-work things.
Different today. Every Friday afternoon is for fun, but it's not the same. People with screen weariness miss meetings, which makes sense. Sometimes you're too busy on Slack to enjoy yourself.
We laugh in meetings, but it's not the same as face-to-face.
Digital social activities can't replace real-world ones
Improved Work-Life Balance, if You Let It
At the outset of the pandemic, I recognized I needed to take better care of myself to survive. After not leaving my apartment for a few days and feeling miserable, I decided to walk before work every day. This turned into a passion for exercise, and today I run or go to the gym before work. I use my commute time for healthful activities.
Working from home makes it easier to keep working after hours. I sometimes forget the time and find myself writing coding at dinnertime. I said, "One more test." This is a disadvantage, therefore I keep my office schedule.
Spend your commute time properly and keep to your office schedule.
Remote Pair Programming Is Hard
As a software developer, I regularly write code. My team sometimes uses pair programming to write code collaboratively. One person writes code while another watches, comments, and asks questions. I won't list them all here.
Internet pairing is difficult. My team struggles with this. Even with Tuple, it's challenging. I lose attention when I get a notification or check my computer.
I miss a pen and paper to rapidly sketch down my thoughts for a colleague or a whiteboard for spirited talks with others. Best answers are found through experience.
Real-life pair programming beats the best remote pair programming tools.
Lessons Learned
Here are 4 lessons I've learned working remotely for 2 years.
-
Socializing is more vital to my health than I anticipated.
-
Digital social activities can't replace in-person ones.
-
Spend your commute time properly and keep your office schedule.
-
Real-life pair programming beats the best remote tools.
Conclusion
Our era is fascinating. Remote labor has existed for years, but software companies have just recently had to adapt. Companies who don't offer remote work will lose talent, in my opinion.
We're still figuring out the finest software development approaches, programming language features, and communication methods since the 1960s. I can't wait to see what advancements assist us go into remote work.
I'll certainly work remotely in the next years, so I'm interested to see what I've learnt from this post then.
This post is a summary of this one.

Leonardo Castorina
2 years ago
How to Use Obsidian to Boost Research Productivity
Tools for managing your PhD projects, reading lists, notes, and inspiration.
As a researcher, you have to know everything. But knowledge is useless if it cannot be accessed quickly. An easy-to-use method of archiving information makes taking notes effortless and enjoyable.
As a PhD student in Artificial Intelligence, I use Obsidian (https://obsidian.md) to manage my knowledge.
The article has three parts:
- What is a note, how to organize notes, tags, folders, and links? This section is tool-agnostic, so you can use most of these ideas with any note-taking app.
- Instructions for using Obsidian, managing notes, reading lists, and useful plugins. This section demonstrates how I use Obsidian, my preferred knowledge management tool.
- Workflows: How to use Zotero to take notes from papers, manage multiple projects' notes, create MOCs with Dataview, and more. This section explains how to use Obsidian to solve common scientific problems and manage/maintain your knowledge effectively.
This list is not perfect or complete, but it is my current solution to problems I've encountered during my PhD. Please leave additional comments or contact me if you have any feedback. I'll try to update this article.
Throughout the article, I'll refer to your digital library as your "Obsidian Vault" or "Zettelkasten".
Other useful resources are listed at the end of the article.
1. Philosophy: Taking and organizing notes
Carl Sagan: “To make an apple pie from scratch, you must first create the universe.”
Before diving into Obsidian, let's establish a Personal Knowledge Management System and a Zettelkasten. You can skip to Section 2 if you already know these terms.
Niklas Luhmann, a prolific sociologist who wrote 400 papers and 70 books, inspired this section and much of Zettelkasten. Zettelkasten means “slip box” (or library in this article). His Zettlekasten had around 90000 physical notes, which can be found here.
There are now many tools available to help with this process. Obsidian's website has a good introduction section: https://publish.obsidian.md/hub/
Notes
We'll start with "What is a note?" Although it may seem trivial, the answer depends on the topic or your note-taking style. The idea is that a note is as “atomic” (i.e. You should read the note and get the idea right away.
The resolution of your notes depends on their detail. Deep Learning, for example, could be a general description of Neural Networks, with a few notes on the various architectures (eg. Recurrent Neural Networks, Convolutional Neural Networks etc..).
Limiting length and detail is a good rule of thumb. If you need more detail in a specific section of this note, break it up into smaller notes. Deep Learning now has three notes:
- Deep Learning
- Recurrent Neural Networks
- Convolutional Neural Networks
Repeat this step as needed until you achieve the desired granularity. You might want to put these notes in a “Neural Networks” folder because they are all about the same thing. But there's a better way:
#Tags and [[Links]] over /Folders/
The main issue with folders is that they are not flexible and assume that all notes in the folder belong to a single category. This makes it difficult to make connections between topics.
Deep Learning has been used to predict protein structure (AlphaFold) and classify images (ImageNet). Imagine a folder structure like this:
- /Proteins/
- Protein Folding
- /Deep Learning/
- /Proteins/
Your notes about Protein Folding and Convolutional Neural Networks will be separate, and you won't be able to find them in the same folder.
This can be solved in several ways. The most common one is to use tags rather than folders. A note can be grouped with multiple topics this way. Obsidian tags can also be nested (have subtags).
You can also link two notes together. You can build your “Knowledge Graph” in Obsidian and other note-taking apps like Obsidian.
My Knowledge Graph. Green: Biology, Red: Machine Learning, Yellow: Autoencoders, Blue: Graphs, Brown: Tags.
My Knowledge Graph and the note “Backrpropagation” and its links.
Backpropagation note and all its links
Why use Folders?
Folders help organize your vault as it grows. The main suggestion is to have few folders that "weakly" collect groups of notes or better yet, notes from different sources.
Among my Zettelkasten folders are:
My Zettelkasten's 5 folders
They usually gather data from various sources:
MOC: Map of Contents for the Zettelkasten.
Projects: Contains one note for each side-project of my PhD where I log my progress and ideas. Notes are linked to these.
Bio and ML: These two are the main content of my Zettelkasten and could theoretically be combined.
Papers: All my scientific paper notes go here. A bibliography links the notes. Zotero .bib file
Books: I make a note for each book I read, which I then split into multiple notes.
Keeping images separate from other files can help keep your main folders clean.
I will elaborate on these in the Workflow Section.
My general recommendation is to use tags and links instead of folders.
Maps of Content (MOC)
Making Tables of Contents is a good solution (MOCs).
These are notes that "signposts" your Zettelkasten library, directing you to the right type of notes. It can link to other notes based on common tags. This is usually done with a title, then your notes related to that title. As an example:
An example of a Machine Learning MOC generated with Dataview.
As shown above, my Machine Learning MOC begins with the basics. Then it's on to Variational Auto-Encoders. Not only does this save time, but it also saves scrolling through the tag search section.
So I keep MOCs at the top of my library so I can quickly find information and see my library. These MOCs are generated automatically using an Obsidian Plugin called Dataview (https://github.com/blacksmithgu/obsidian-dataview).
Ideally, MOCs could be expanded to include more information about the notes, their status, and what's left to do. In the absence of this, Dataview does a fantastic job at creating a good structure for your notes.
In the absence of this, Dataview does a fantastic job at creating a good structure for your notes.
2. Tools: Knowing Obsidian
Obsidian is my preferred tool because it is free, all notes are stored in Markdown format, and each panel can be dragged and dropped. You can get it here: https://obsidian.md/
Obsidian interface.
Obsidian is highly customizable, so here is my preferred interface:
The theme is customized from https://github.com/colineckert/obsidian-things
Alternatively, each panel can be collapsed, moved, or removed as desired. To open a panel later, click on the vertical "..." (bottom left of the note panel).
My interface is organized as follows:
How my Obsidian Interface is organized.
Folders/Search:
This is where I keep all relevant folders. I usually use the MOC note to navigate, but sometimes I use the search button to find a note.
Tags:
I use nested tags and look into each one to find specific notes to link.
cMenu:
Easy-to-use menu plugin cMenu (https://github.com/chetachiezikeuzor/cMenu-Plugin)
Global Graph:
The global graph shows all your notes (linked and unlinked). Linked notes will appear closer together. Zoom in to read each note's title. It's a bit overwhelming at first, but as your library grows, you get used to the positions and start thinking of new connections between notes.
Local Graph:
Your current note will be shown in relation to other linked notes in your library. When needed, you can quickly jump to another link and back to the current note.
Links:
Finally, an outline panel and the plugin Obsidian Power Search (https://github.com/aviral-batra/obsidian-power-search) allow me to search my vault by highlighting text.
Start using the tool and worry about panel positioning later. I encourage you to find the best use-case for your library.
Plugins
An additional benefit of using Obsidian is the large plugin library. I use several (Calendar, Citations, Dataview, Templater, Admonition):
Obsidian Calendar Plugin: https://github.com/liamcain
It organizes your notes on a calendar. This is ideal for meeting notes or keeping a journal.
Calendar addon from hans/obsidian-citation-plugin
Obsidian Citation Plugin: https://github.com/hans/
Allows you to cite papers from a.bib file. You can also customize your notes (eg. Title, Authors, Abstract etc..)
Plugin citation from hans/obsidian-citation-plugin
Obsidian Dataview: https://github.com/blacksmithgu/
A powerful plugin that allows you to query your library as a database and generate content automatically. See the MOC section for an example.
Allows you to create notes with specific templates like dates, tags, and headings.
Templater. Obsidian Admonition: https://github.com/valentine195/obsidian-admonition
Blocks allow you to organize your notes.
Plugin warning. Obsidian Admonition (valentine195)
There are many more, but this list should get you started.
3. Workflows: Cool stuff
Here are a few of my workflows for using obsidian for scientific research. This is a list of resources I've found useful for my use-cases. I'll outline and describe them briefly so you can skim them quickly.
3.1 Using Templates to Structure Notes
3.2 Free Note Syncing (Laptop, Phone, Tablet)
3.3 Zotero/Mendeley/JabRef -> Obsidian — Managing Reading Lists
3.4 Projects and Lab Books
3.5 Private Encrypted Diary
3.1 Using Templates to Structure Notes
Plugins: Templater and Dataview (optional).
To take effective notes, you must first make adding new notes as easy as possible. Templates can save you time and give your notes a consistent structure. As an example:
An example of a note using a template.
### [[YOUR MOC]]
# Note Title of your note
**Tags**::
**Links**::
The top line links to your knowledge base's Map of Content (MOC) (see previous sections). After the title, I add tags (and a link between the note and the tag) and links to related notes.
To quickly identify all notes that need to be expanded, I add the tag “#todo”. In the “TODO:” section, I list the tasks within the note.
The rest are notes on the topic.
Templater can help you create these templates. For new books, I use the following template:
### [[Books MOC]]
# Title
**Author**::
**Date::
**Tags::
**Links::
A book template example.
Using a simple query, I can hook Dataview to it.
dataview
table author as Author, date as “Date Finished”, tags as “Tags”, grade as “Grade”
from “4. Books”
SORT grade DESCENDING
using Dataview to query templates.
3.2 Free Note Syncing (Laptop, Phone, Tablet)
No plugins used.
One of my favorite features of Obsidian is the library's self-contained and portable format. Your folder contains everything (plugins included).
Ordinary folders and documents are available as well. There is also a “.obsidian” folder. This contains all your plugins and settings, so you can use it on other devices.
So you can use Google Drive, iCloud, or Dropbox for free as long as you sync your folder (note: your folder should be in your Cloud Folder).
For my iOS and macOS work, I prefer iCloud. You can also use the paid service Obsidian Sync.
3.3 Obsidian — Managing Reading Lists and Notes in Zotero/Mendeley/JabRef
Plugins: Quotes (required).
3.3 Zotero/Mendeley/JabRef -> Obsidian — Taking Notes and Managing Reading Lists of Scientific Papers
My preferred reference manager is Zotero, but this workflow should work with any reference manager that produces a .bib file. This file is exported to my cloud folder so I can access it from any platform.
My Zotero library is tagged as follows:
My reference manager's tags
For readings, I usually search for the tags “!!!” and “To-Read” and select a paper. Annotate the paper next (either on PDF using GoodNotes or on physical paper).
Then I make a paper page using a template in the Citations plugin settings:
An example of my citations template.
Create a new note, open the command list with CMD/CTRL + P, and find the Citations “Insert literature note content in the current pane” to see this lovely view.
Citation generated by the article https://doi.org/10.1101/2022.01.24.22269144
You can then convert your notes to digital. I found that transcribing helped me retain information better.
3.4 Projects and Lab Books
Plugins: Tweaker (required).
PhD students offering advice on thesis writing are common (read as regret). I started asking them what they would have done differently or earlier.
“Deep stuff Leo,” one person said. So my main issue is basic organization, losing track of my tasks and the reasons for them.
As a result, I'd go on other experiments that didn't make sense, and have to reverse engineer my logic for thesis writing. - PhD student now wise Postdoc
Time management requires planning. Keeping track of multiple projects and lab books is difficult during a PhD. How I deal with it:
- One folder for all my projects
- One file for each project
I use a template to create each project
### [[Projects MOC]]
# <% tp.file.title %>
**Tags**::
**Links**::
**URL**::
**Project Description**::## Notes:
### <% tp.file.last_modified_date(“dddd Do MMMM YYYY”) %>
#### Done:
#### TODO:
#### Notes
You can insert a template into a new note with CMD + P and looking for the Templater option.
I then keep adding new days with another template:
### <% tp.file.last_modified_date("dddd Do MMMM YYYY") %>
#### Done:
#### TODO:
#### Notes:
This way you can keep adding days to your project and update with reasonings and things you still have to do and have done. An example below:
Example of project note with timestamped notes.
3.5 Private Encrypted Diary
This is one of my favorite Obsidian uses.
Mini Diary's interface has long frustrated me. After the author archived the project, I looked for a replacement. I had two demands:
- It had to be private, and nobody had to be able to read the entries.
- Cloud syncing was required for editing on multiple devices.
Then I learned about encrypting the Obsidian folder. Then decrypt and open the folder with Obsidian. Sync the folder as usual.
Use CryptoMator (https://cryptomator.org/). Create an encrypted folder in Cryptomator for your Obsidian vault, set a password, and let it do the rest.
If you need a step-by-step video guide, here it is:
Conclusion
So, I hope this was helpful!
In the first section of the article, we discussed notes and note-taking techniques. We discussed when to use tags and links over folders and when to break up larger notes.
Then we learned about Obsidian, its interface, and some useful plugins like Citations for citing papers and Templater for creating note templates.
Finally, we discussed workflows and how to use Zotero to take notes from scientific papers, as well as managing Lab Books and Private Encrypted Diaries.
Thanks for reading and commenting :)
Read original post here
You might also like

middlemarch.eth
2 years ago
ERC721R: A new ERC721 contract for random minting so people don’t snipe all the rares!
That is, how to snipe all the rares without using ERC721R!
Introduction: Blessed and Lucky
Mphers was the first mfers derivative, and as a Phunks derivative, I wanted one.
I wanted an alien. And there are only 8 in the 6,969 collection. I got one!
In case it wasn't clear from the tweet, I meant that I was lucky to have figured out how to 100% guarantee I'd get an alien without any extra luck.
Read on to find out how I did it, how you can too, and how developers can avoid it!
How to make rare NFTs without luck.
# How to mint rare NFTs without needing luck
The key to minting a rare NFT is knowing the token's id ahead of time.
For example, once I knew my alien was #4002, I simply refreshed the mint page until #3992 was minted, and then mint 10 mphers.
How did I know #4002 was extraterrestrial? Let's go back.
First, go to the mpher contract's Etherscan page and look up the tokenURI of a previously issued token, token #1:
As you can see, mphers creates metadata URIs by combining the token id and an IPFS hash.
This method gives you the collection's provenance in every URI, and while that URI can be changed, it affects everyone and is public.
Consider a token URI without a provenance hash, like https://mphers.art/api?tokenId=1.
As a collector, you couldn't be sure the devs weren't changing #1's metadata at will.
The API allows you to specify “if #4002 has not been minted, do not show any information about it”, whereas IPFS does not allow this.
It's possible to look up the metadata of any token, whether or not it's been minted.
Simply replace the trailing “1” with your desired id.
Mpher #4002
These files contain all the information about the mpher with the specified id. For my alien, we simply search all metadata files for the string “alien mpher.”
Take a look at the 6,969 meta-data files I'm using OpenSea's IPFS gateway, but you could use ipfs.io or something else.
Use curl to download ten files at once. Downloading thousands of files quickly can lead to duplicates or errors. But with a little tweaking, you should be able to get everything (and dupes are fine for our purposes).
Now that you have everything in one place, grep for aliens:
The numbers are the file names that contain “alien mpher” and thus the aliens' ids.
The entire process takes under ten minutes. This technique works on many NFTs currently minting.
In practice, manually minting at the right time to get the alien is difficult, especially when tokens mint quickly. Then write a bot to poll totalSupply() every second and submit the mint transaction at the exact right time.
You could even look for the token you need in the mempool before it is minted, and get your mint into the same block!
However, in my experience, the “big” approach wins 95% of the time—but not 100%.
“Am I being set up all along?”
Is a question you might ask yourself if you're new to this.
It's disheartening to think you had no chance of minting anything that someone else wanted.
But, did you have no opportunity? You had an equal chance as everyone else!
Take me, for instance: I figured this out using open-source tools and free public information. Anyone can do this, and not understanding how a contract works before minting will lead to much worse issues.
The mpher mint was fair.
While a fair game, “snipe the alien” may not have been everyone's cup of tea.
People may have had more fun playing the “mint lottery” where tokens were distributed at random and no one could gain an advantage over someone simply clicking the “mint” button.
How might we proceed?
Minting For Fashion Hats Punks, I wanted to create a random minting experience without sacrificing fairness. In my opinion, a predictable mint beats an unfair one. Above all, participants must be equal.
Sadly, the most common method of creating a random experience—the post-mint “reveal”—is deeply unfair. It works as follows:
- During the mint, token metadata is unavailable. Instead, tokenURI() returns a blank JSON file for each id.
- An IPFS hash is updated once all tokens are minted.
- You can't tell how the contract owner chose which token ids got which metadata, so it appears random.
Because they alone decide who gets what, the person setting the metadata clearly has a huge unfair advantage over the people minting. Unlike the mpher mint, you have no chance of winning here.
But what if it's a well-known, trusted, doxxed dev team? Are reveals okay here?
No! No one should be trusted with such power. Even if someone isn't consciously trying to cheat, they have unconscious biases. They might also make a mistake and not realize it until it's too late, for example.
You should also not trust yourself. Imagine doing a reveal, thinking you did it correctly (nothing is 100%! ), and getting the rarest NFT. Isn't that a tad odd Do you think you deserve it? An NFT developer like myself would hate to be in this situation.
Reveals are bad*
UNLESS they are done without trust, meaning everyone can verify their fairness without relying on the developers (which you should never do).
An on-chain reveal powered by randomness that is verifiably outside of anyone's control is the most common way to achieve a trustless reveal (e.g., through Chainlink).
Tubby Cats did an excellent job on this reveal, and I highly recommend their contract and launch reflections. Their reveal was also cool because it was progressive—you didn't have to wait until the end of the mint to find out.
In his post-launch reflections, @DefiLlama stated that he made the contract as trustless as possible, removing as much trust as possible from the team.
In my opinion, everyone should know the rules of the game and trust that they will not be changed mid-stream, while trust minimization is critical because smart contracts were designed to reduce trust (and it makes it impossible to hack even if the team is compromised). This was a huge mistake because it limited our flexibility and our ability to correct mistakes.
And @DefiLlama is a superstar developer. Imagine how much stress maximizing trustlessness will cause you!
That leaves me with a bad solution that works in 99 percent of cases and is much easier to implement: random token assignments.
Introducing ERC721R: A fully compliant IERC721 implementation that picks token ids at random.
ERC721R implements the opposite of a reveal: we mint token ids randomly and assign metadata deterministically.
This allows us to reveal all metadata prior to minting while reducing snipe chances.
Then import the contract and use this code:
What is ERC721R and how does it work
First, a disclaimer: ERC721R isn't truly random. In this sense, it creates the same “game” as the mpher situation, where minters compete to exploit the mint. However, ERC721R is a much more difficult game.
To game ERC721R, you need to be able to predict a hash value using these inputs:
This is impossible for a normal person because it requires knowledge of the block timestamp of your mint, which you do not have.
To do this, a miner must set the timestamp to a value in the future, and whatever they do is dependent on the previous block's hash, which expires in about ten seconds when the next block is mined.
This pseudo-randomness is “good enough,” but if big money is involved, it will be gamed. Of course, the system it replaces—predictable minting—can be manipulated.
The token id is chosen in a clever implementation of the Fisher–Yates shuffle algorithm that I copied from CryptoPhunksV2.
Consider first the naive solution: (a 10,000 item collection is assumed):
- Make an array with 0–9999.
- To create a token, pick a random item from the array and use that as the token's id.
- Remove that value from the array and shorten it by one so that every index corresponds to an available token id.
This works, but it uses too much gas because changing an array's length and storing a large array of non-zero values is expensive.
How do we avoid them both? What if we started with a cheap 10,000-zero array? Let's assign an id to each index in that array.
Assume we pick index #6500 at random—#6500 is our token id, and we replace the 0 with a 1.
But what if we chose #6500 again? A 1 would indicate #6500 was taken, but then what? We can't just "roll again" because gas will be unpredictable and high, especially later mints.
This allows us to pick a token id 100% of the time without having to keep a separate list. Here's how it works:
- Make a 10,000 0 array.
- Create a 10,000 uint numAvailableTokens.
- Pick a number between 0 and numAvailableTokens. -1
- Think of #6500—look at index #6500. If it's 0, the next token id is #6500. If not, the value at index #6500 is your next token id (weird!)
- Examine the array's last value, numAvailableTokens — 1. If it's 0, move the value at #6500 to the end of the array (#9999 if it's the first token). If the array's last value is not zero, update index #6500 to store it.
- numAvailableTokens is decreased by 1.
- Repeat 3–6 for the next token id.
So there you go! The array stays the same size, but we can choose an available id reliably. The Solidity code is as follows:
Unfortunately, this algorithm uses more gas than the leading sequential mint solution, ERC721A.
This is most noticeable when minting multiple tokens in one transaction—a 10 token mint on ERC721R costs 5x more than on ERC721A. That said, ERC721A has been optimized much further than ERC721R so there is probably room for improvement.
Conclusion
Listed below are your options:
- ERC721A: Minters pay lower gas but must spend time and energy devising and executing a competitive minting strategy or be comfortable with worse minting results.
- ERC721R: Higher gas, but the easy minting strategy of just clicking the button is optimal in all but the most extreme cases. If miners game ERC721R it’s the worst of both worlds: higher gas and a ton of work to compete.
- ERC721A + standard reveal: Low gas, but not verifiably fair. Please do not do this!
- ERC721A + trustless reveal: The best solution if done correctly, highly-challenging for dev, potential for difficult-to-correct errors.
Did I miss something? Comment or tweet me @dumbnamenumbers.
Check out the code on GitHub to learn more! Pull requests are welcome—I'm sure I've missed many gas-saving opportunities.
Thanks!
Read the original post here

Dmitrii Eliuseev
1 year ago
Creating Images on Your Local PC Using Stable Diffusion AI
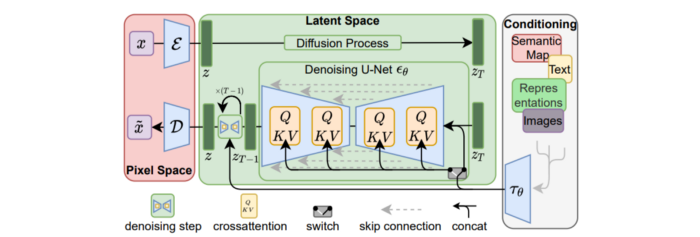
Deep learning-based generative art is being researched. As usual, self-learning is better. Some models, like OpenAI's DALL-E 2, require registration and can only be used online, but others can be used locally, which is usually more enjoyable for curious users. I'll demonstrate the Stable Diffusion model's operation on a standard PC.

Let’s get started.
What It Does
Stable Diffusion uses numerous components:
A generative model trained to produce images is called a diffusion model. The model is incrementally improving the starting data, which is only random noise. The model has an image, and while it is being trained, the reversed process is being used to add noise to the image. Being able to reverse this procedure and create images from noise is where the true magic is (more details and samples can be found in the paper).
An internal compressed representation of a latent diffusion model, which may be altered to produce the desired images, is used (more details can be found in the paper). The capacity to fine-tune the generation process is essential because producing pictures at random is not very attractive (as we can see, for instance, in Generative Adversarial Networks).
A neural network model called CLIP (Contrastive Language-Image Pre-training) is used to translate natural language prompts into vector representations. This model, which was trained on 400,000,000 image-text pairs, enables the transformation of a text prompt into a latent space for the diffusion model in the scenario of stable diffusion (more details in that paper).
This figure shows all data flow:
The weights file size for Stable Diffusion model v1 is 4 GB and v2 is 5 GB, making the model quite huge. The v1 model was trained on 256x256 and 512x512 LAION-5B pictures on a 4,000 GPU cluster using over 150.000 NVIDIA A100 GPU hours. The open-source pre-trained model is helpful for us. And we will.
Install
Before utilizing the Python sources for Stable Diffusion v1 on GitHub, we must install Miniconda (assuming Git and Python are already installed):
wget https://repo.anaconda.com/miniconda/Miniconda3-py39_4.12.0-Linux-x86_64.sh
chmod +x Miniconda3-py39_4.12.0-Linux-x86_64.sh
./Miniconda3-py39_4.12.0-Linux-x86_64.sh
conda update -n base -c defaults conda
Install the source and prepare the environment:
git clone https://github.com/CompVis/stable-diffusion
cd stable-diffusion
conda env create -f environment.yaml
conda activate ldm
pip3 install transformers --upgrade
Download the pre-trained model weights next. HiggingFace has the newest checkpoint sd-v14.ckpt (a download is free but registration is required). Put the file in the project folder and have fun:
python3 scripts/txt2img.py --prompt "hello world" --plms --ckpt sd-v1-4.ckpt --skip_grid --n_samples 1Almost. The installation is complete for happy users of current GPUs with 12 GB or more VRAM. RuntimeError: CUDA out of memory will occur otherwise. Two solutions exist.
Running the optimized version
Try optimizing first. After cloning the repository and enabling the environment (as previously), we can run the command:
python3 optimizedSD/optimized_txt2img.py --prompt "hello world" --ckpt sd-v1-4.ckpt --skip_grid --n_samples 1Stable Diffusion worked on my visual card with 8 GB RAM (alas, I did not behave well enough to get NVIDIA A100 for Christmas, so 8 GB GPU is the maximum I have;).
Running Stable Diffusion without GPU
If the GPU does not have enough RAM or is not CUDA-compatible, running the code on a CPU will be 20x slower but better than nothing. This unauthorized CPU-only branch from GitHub is easiest to obtain. We may easily edit the source code to use the latest version. It's strange that a pull request for that was made six months ago and still hasn't been approved, as the changes are simple. Readers can finish in 5 minutes:
Replace if attr.device!= torch.device(cuda) with if attr.device!= torch.device(cuda) and torch.cuda.is available at line 20 of ldm/models/diffusion/ddim.py ().
Replace if attr.device!= torch.device(cuda) with if attr.device!= torch.device(cuda) and torch.cuda.is available in line 20 of ldm/models/diffusion/plms.py ().
Replace device=cuda in lines 38, 55, 83, and 142 of ldm/modules/encoders/modules.py with device=cuda if torch.cuda.is available(), otherwise cpu.
Replace model.cuda() in scripts/txt2img.py line 28 and scripts/img2img.py line 43 with if torch.cuda.is available(): model.cuda ().
Run the script again.
Testing
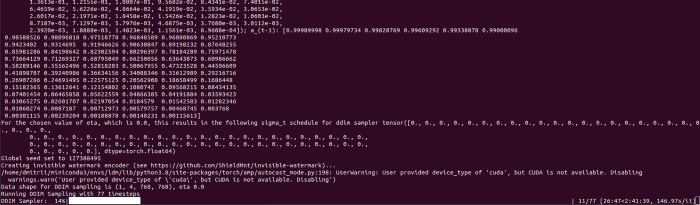
Test the model. Text-to-image is the first choice. Test the command line example again:
python3 scripts/txt2img.py --prompt "hello world" --plms --ckpt sd-v1-4.ckpt --skip_grid --n_samples 1The slow generation takes 10 seconds on a GPU and 10 minutes on a CPU. Final image:
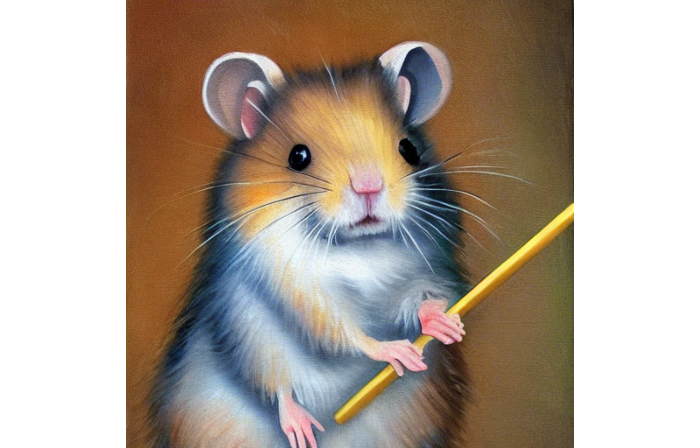
Hello world is dull and abstract. Try a brush-wielding hamster. Why? Because we can, and it's not as insane as Napoleon's cat. Another image:
Generating an image from a text prompt and another image is interesting. I made this picture in two minutes using the image editor (sorry, drawing wasn't my strong suit):
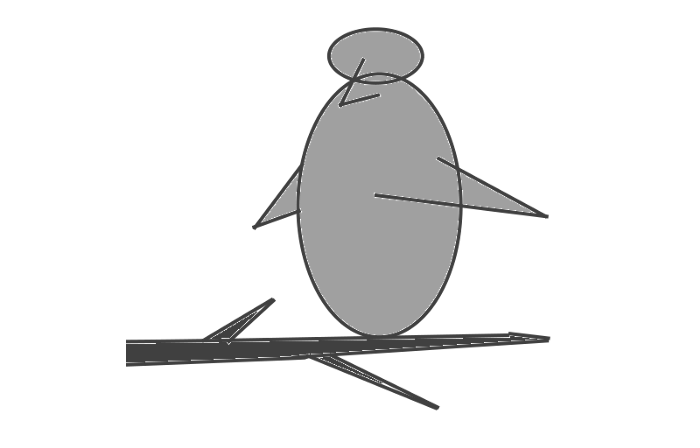
I can create an image from this drawing:
python3 scripts/img2img.py --prompt "A bird is sitting on a tree branch" --ckpt sd-v1-4.ckpt --init-img bird.png --strength 0.8It was far better than my initial drawing:

I hope readers understand and experiment.
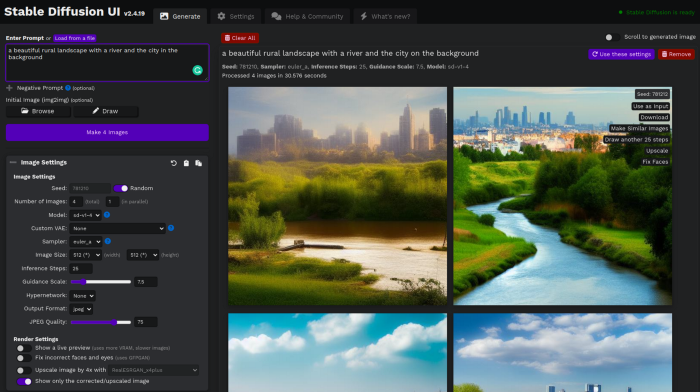
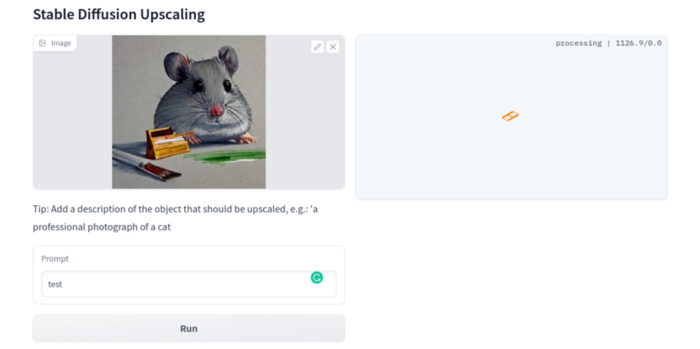
Stable Diffusion UI
Developers love the command line, but regular users may struggle. Stable Diffusion UI projects simplify image generation and installation. Simple usage:
Unpack the ZIP after downloading it from https://github.com/cmdr2/stable-diffusion-ui/releases. Linux and Windows are compatible with Stable Diffusion UI (sorry for Mac users, but those machines are not well-suitable for heavy machine learning tasks anyway;).
Start the script.
Done. The web browser UI makes configuring various Stable Diffusion features (upscaling, filtering, etc.) easy:
V2.1 of Stable Diffusion
I noticed the notification about releasing version 2.1 while writing this essay, and it was intriguing to test it. First, compare version 2 to version 1:
alternative text encoding. The Contrastive LanguageImage Pre-training (CLIP) deep learning model, which was trained on a significant number of text-image pairs, is used in Stable Diffusion 1. The open-source CLIP implementation used in Stable Diffusion 2 is called OpenCLIP. It is difficult to determine whether there have been any technical advancements or if legal concerns were the main focus. However, because the training datasets for the two text encoders were different, the output results from V1 and V2 will differ for the identical text prompts.
a new depth model that may be used to the output of image-to-image generation.
a revolutionary upscaling technique that can quadruple the resolution of an image.
Generally higher resolution Stable Diffusion 2 has the ability to produce both 512x512 and 768x768 pictures.
The Hugging Face website offers a free online demo of Stable Diffusion 2.1 for code testing. The process is the same as for version 1.4. Download a fresh version and activate the environment:
conda deactivate
conda env remove -n ldm  # Use this if version 1 was previously installed
git clone https://github.com/Stability-AI/stablediffusion
cd stablediffusion
conda env create -f environment.yaml
conda activate ldm
Hugging Face offers a new weights ckpt file.
The Out of memory error prevented me from running this version on my 8 GB GPU. Version 2.1 fails on CPUs with the slow conv2d cpu not implemented for Half error (according to this GitHub issue, the CPU support for this algorithm and data type will not be added). The model can be modified from half to full precision (float16 instead of float32), however it doesn't make sense since v1 runs up to 10 minutes on the CPU and v2.1 should be much slower. The online demo results are visible. The same hamster painting with a brush prompt yielded this result:
It looks different from v1, but it functions and has a higher resolution.
The superresolution.py script can run the 4x Stable Diffusion upscaler locally (the x4-upscaler-ema.ckpt weights file should be in the same folder):
python3 scripts/gradio/superresolution.py configs/stable-diffusion/x4-upscaling.yaml x4-upscaler-ema.ckptThis code allows the web browser UI to select the image to upscale:
The copy-paste strategy may explain why the upscaler needs a text prompt (and the Hugging Face code snippet does not have any text input as well). I got a GPU out of memory error again, although CUDA can be disabled like v1. However, processing an image for more than two hours is unlikely:
Stable Diffusion Limitations
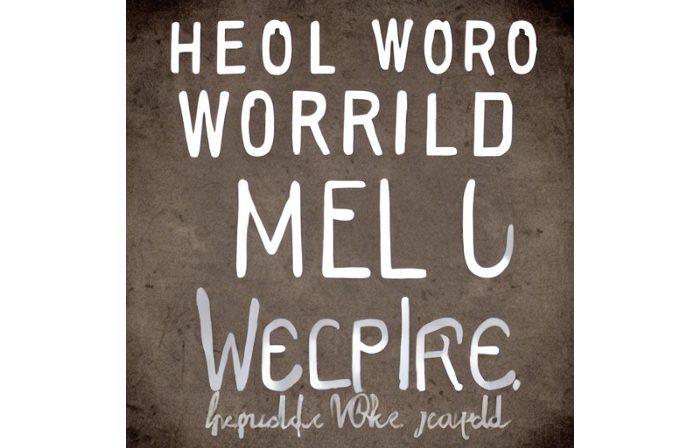
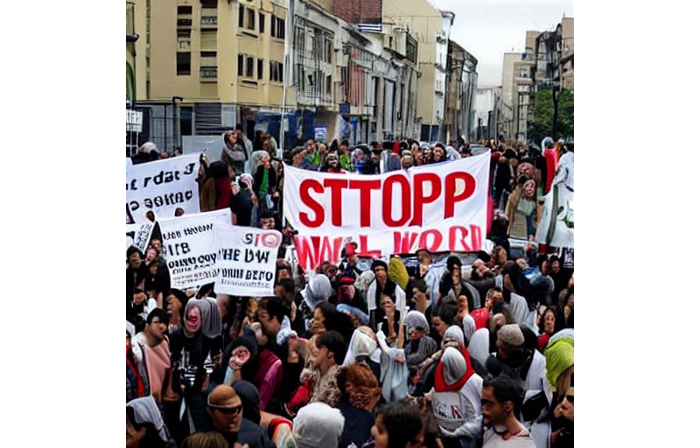
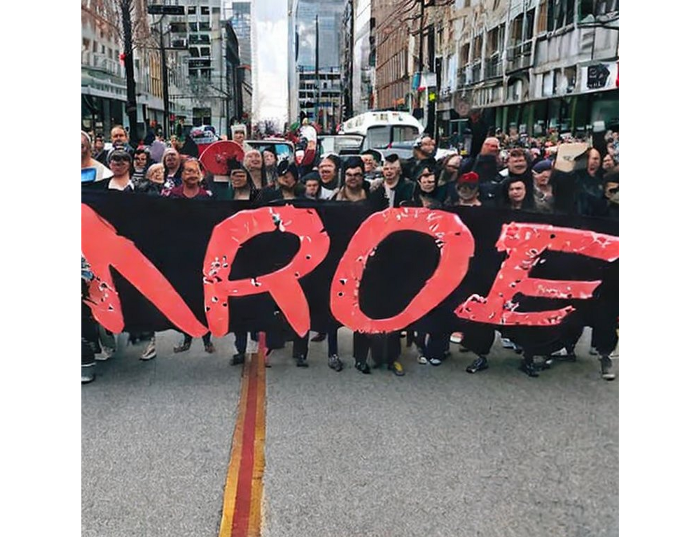
When we use the model, it's fun to see what it can and can't do. Generative models produce abstract visuals but not photorealistic ones. This fundamentally limits The generative neural network was trained on text and image pairs, but humans have a lot of background knowledge about the world. The neural network model knows nothing. If someone asks me to draw a Chinese text, I can draw something that looks like Chinese but is actually gibberish because I never learnt it. Generative AI does too! Humans can learn new languages, but the Stable Diffusion AI model includes only language and image decoder brain components. For instance, the Stable Diffusion model will pull NO WAR banner-bearers like this:
V1:
V2.1:
The shot shows text, although the model never learned to read or write. The model's string tokenizer automatically converts letters to lowercase before generating the image, so typing NO WAR banner or no war banner is the same.
I can also ask the model to draw a gorgeous woman:
V1:

V2.1:

The first image is gorgeous but physically incorrect. A second one is better, although it has an Uncanny valley feel. BTW, v2 has a lifehack to add a negative prompt and define what we don't want on the image. Readers might try adding horrible anatomy to the gorgeous woman request.
If we ask for a cartoon attractive woman, the results are nice, but accuracy doesn't matter:
V1:

V2.1:

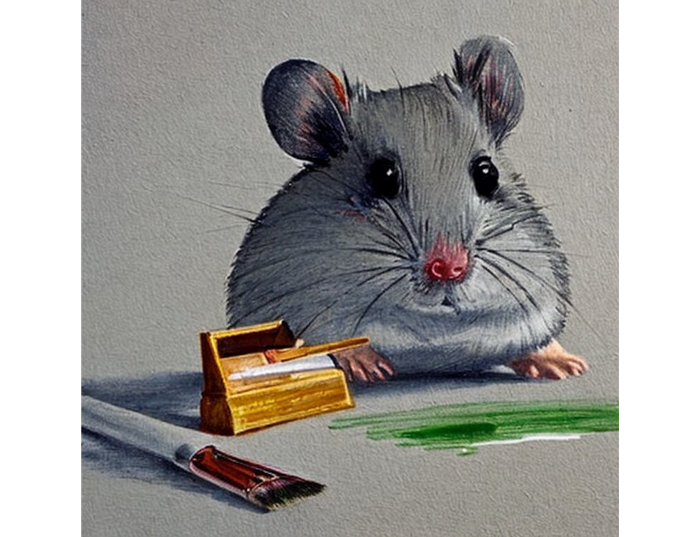
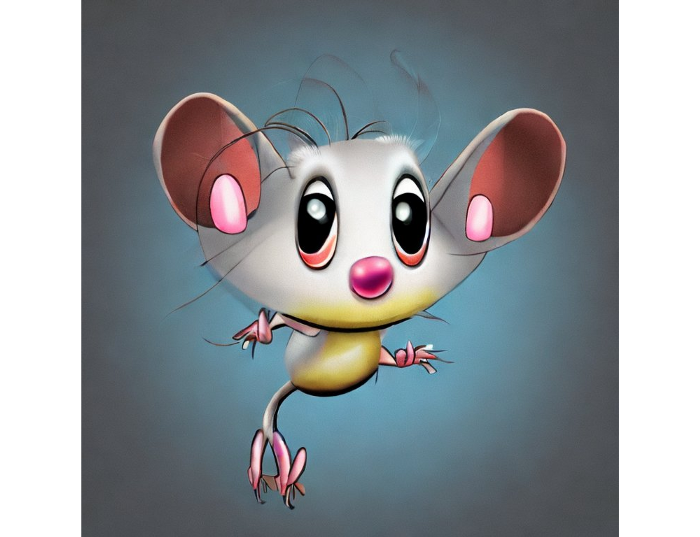
Another example: I ordered a model to sketch a mouse, which looks beautiful but has too many legs, ears, and fingers:
V1:
V2.1: improved but not perfect.
V1 produces a fun cartoon flying mouse if I want something more abstract:

I tried multiple times with V2.1 but only received this:
The image is OK, but the first version is closer to the request.
Stable Diffusion struggles to draw letters, fingers, etc. However, abstract images yield interesting outcomes. A rural landscape with a modern metropolis in the background turned out well:
V1:

V2.1:

Generative models help make paintings too (at least, abstract ones). I searched Google Image Search for modern art painting to see works by real artists, and this was the first image:
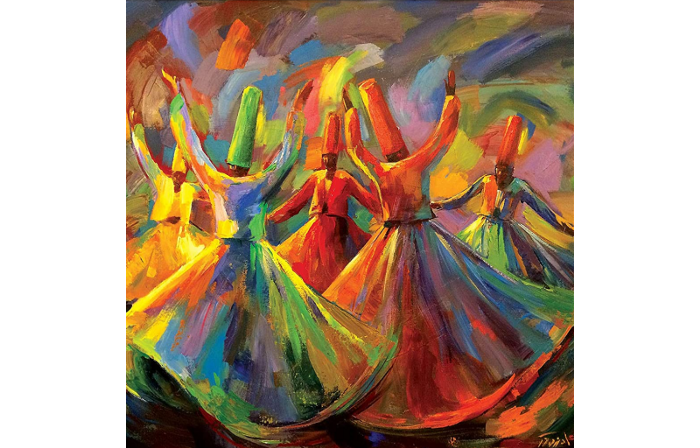
I typed "abstract oil painting of people dancing" and got this:
V1:
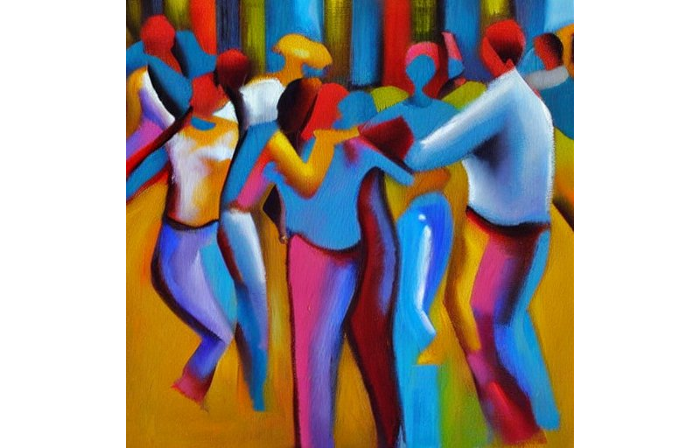
V2.1:
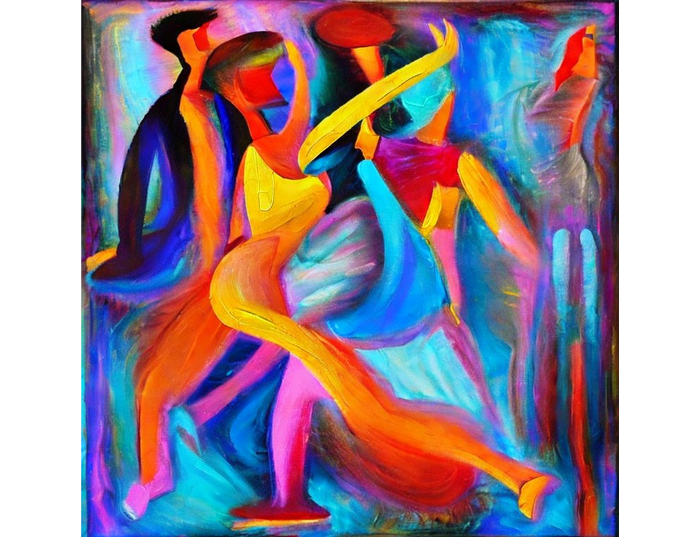
It's a different style, but I don't think the AI-generated graphics are worse than the human-drawn ones.
The AI model cannot think like humans. It thinks nothing. A stable diffusion model is a billion-parameter matrix trained on millions of text-image pairs. I input "robot is creating a picture with a pen" to create an image for this post. Humans understand requests immediately. I tried Stable Diffusion multiple times and got this:
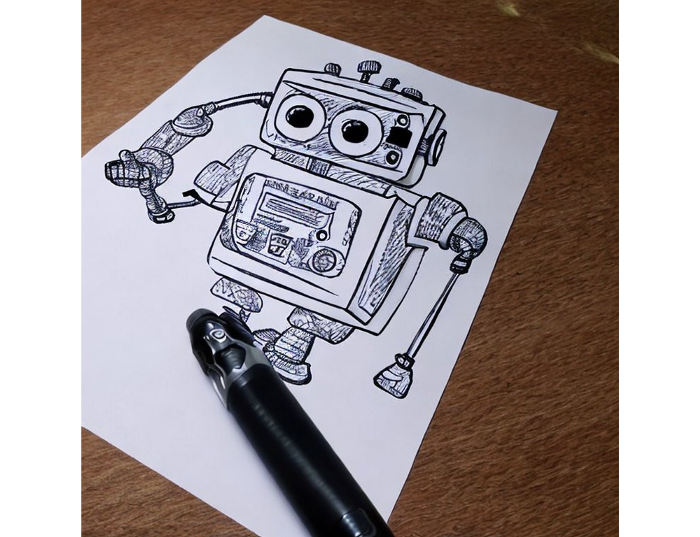
This great artwork has a pen, robot, and sketch, however it was not asked. Maybe it was because the tokenizer deleted is and a words from a statement, but I tried other requests such robot painting picture with pen without success. It's harder to prompt a model than a person.
I hope Stable Diffusion's general effects are evident. Despite its limitations, it can produce beautiful photographs in some settings. Readers who want to use Stable Diffusion results should be warned. Source code examination demonstrates that Stable Diffusion images feature a concealed watermark (text StableDiffusionV1 and SDV2) encoded using the invisible-watermark Python package. It's not a secret, because the official Stable Diffusion repository's test watermark.py file contains a decoding snippet. The put watermark line in the txt2img.py source code can be removed if desired. I didn't discover this watermark on photographs made by the online Hugging Face demo. Maybe I did something incorrectly (but maybe they are just not using the txt2img script on their backend at all).
Conclusion
The Stable Diffusion model was fascinating. As I mentioned before, trying something yourself is always better than taking someone else's word, so I encourage readers to do the same (including this article as well;).
Is Generative AI a game-changer? My humble experience tells me:
I think that place has a lot of potential. For designers and artists, generative AI can be a truly useful and innovative tool. Unfortunately, it can also pose a threat to some of them since if users can enter a text field to obtain a picture or a website logo in a matter of clicks, why would they pay more to a different party? Is it possible right now? unquestionably not yet. Images still have a very poor quality and are erroneous in minute details. And after viewing the image of the stunning woman above, models and fashion photographers may also unwind because it is highly unlikely that AI will replace them in the upcoming years.
Today, generative AI is still in its infancy. Even 768x768 images are considered to be of a high resolution when using neural networks, which are computationally highly expensive. There isn't an AI model that can generate high-resolution photographs natively without upscaling or other methods, at least not as of the time this article was written, but it will happen eventually.
It is still a challenge to accurately represent knowledge in neural networks (information like how many legs a cat has or the year Napoleon was born). Consequently, AI models struggle to create photorealistic photos, at least where little details are important (on the other side, when I searched Google for modern art paintings, the results are often even worse;).
When compared to the carefully chosen images from official web pages or YouTube reviews, the average output quality of a Stable Diffusion generation process is actually less attractive because to its high degree of randomness. When using the same technique on their own, consumers will theoretically only view those images as 1% of the results.
Anyway, it's exciting to witness this area's advancement, especially because the project is open source. Google's Imagen and DALL-E 2 can also produce remarkable findings. It will be interesting to see how they progress.

Thomas Tcheudjio
1 year ago
If you don't crush these 3 metrics, skip the Series A.
I recently wrote about getting VCs excited about Marketplace start-ups. SaaS founders became envious!
Understanding how people wire tens of millions is the only Series A hack I recommend.
Few people understand the intellectual process behind investing.
VC is risk management.
Series A-focused VCs must cover two risks.
1. Market risk
You need a large market to cross a threshold beyond which you can build defensibilities. Series A VCs underwrite market risk.
They must see you have reached product-market fit (PMF) in a large total addressable market (TAM).
2. Execution risk
When evaluating your growth engine's blitzscaling ability, execution risk arises.
When investors remove operational uncertainty, they profit.
Series A VCs like businesses with derisked revenue streams. Don't raise unless you have a predictable model, pipeline, and growth.
Please beat these 3 metrics before Series A:
Achieve $1.5m ARR in 12-24 months (Market risk)
Above 100% Net Dollar Retention. (Market danger)
Lead Velocity Rate supporting $10m ARR in 2–4 years (Execution risk)
Hit the 3 and you'll raise $10M in 4 months. Discussing 2/3 may take 6–7 months.
If none, don't bother raising and focus on becoming a capital-efficient business (Topics for other posts).
Let's examine these 3 metrics for the brave ones.
1. Lead Velocity Rate supporting €$10m ARR in 2 to 4 years
Last because it's the least discussed. LVR is the most reliable data when evaluating a growth engine, in my opinion.
SaaS allows you to see the future.
Monthly Sales and Sales Pipelines, two predictive KPIs, have poor data quality. Both are lagging indicators, and minor changes can cause huge modeling differences.
Analysts and Associates will trash your forecasts if they're based only on Monthly Sales and Sales Pipeline.
LVR, defined as month-over-month growth in qualified leads, is rock-solid. There's no lag. You can See The Future if you use Qualified Leads and a consistent formula and process to qualify them.
With this metric in your hand, scaling your company turns into an execution play on which VCs are able to perform calculations risk.
2. Above-100% Net Dollar Retention.
Net Dollar Retention is a better-known SaaS health metric than LVR.
Net Dollar Retention measures a SaaS company's ability to retain and upsell customers. Ask what $1 of net new customer spend will be worth in years n+1, n+2, etc.
Depending on the business model, SaaS businesses can increase their share of customers' wallets by increasing users, selling them more products in SaaS-enabled marketplaces, other add-ons, and renewing them at higher price tiers.
If a SaaS company's annualized Net Dollar Retention is less than 75%, there's a problem with the business.
Slack's ARR chart (below) shows how powerful Net Retention is. Layer chart shows how existing customer revenue grows. Slack's S1 shows 171% Net Dollar Retention for 2017–2019.

Slack S-1
3. $1.5m ARR in the last 12-24 months.
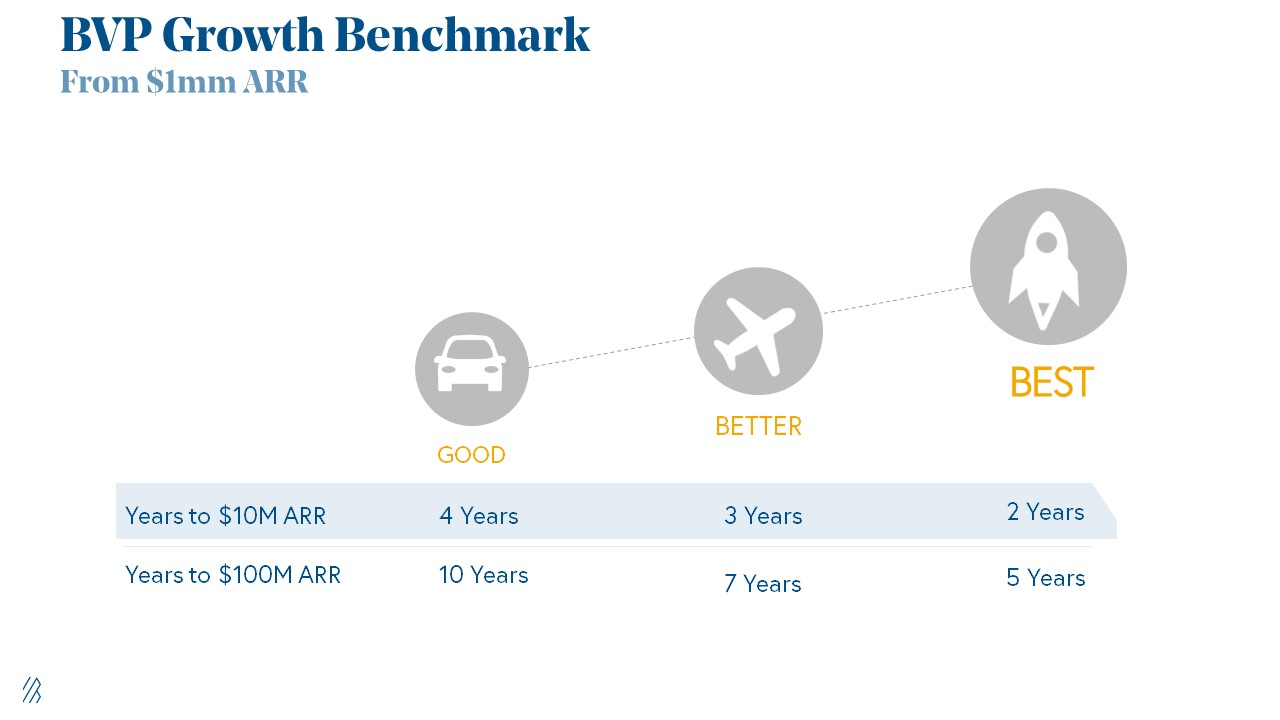
According to Point 9, $0.5m-4m in ARR is needed to raise a $5–12m Series A round.
Target at least what you raised in Pre-Seed/Seed. If you've raised $1.5m since launch, don't raise before $1.5m ARR.
Capital efficiency has returned since Covid19. After raising $2m since inception, it's harder to raise $1m in ARR.

P9's 2016-2021 SaaS Funding Napkin
In summary, less than 1% of companies VCs meet get funded. These metrics can help you win.
If there’s demand for it, I’ll do one on direct-to-consumer.
Cheers!